Note: Create a Restore Point before making any chances to Windows Settings.
Step 1: Right-click on the Taskbar.
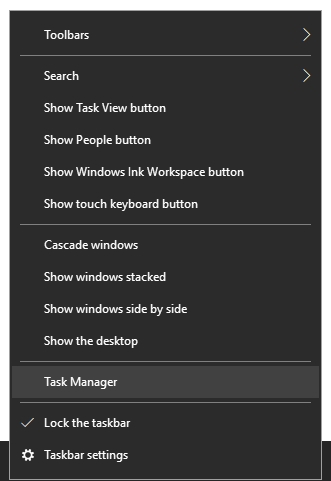
Step 2: Click the Task Manager option to open it.
Step 3: In Task Manager, click on the Startup tab to view the Windows Startup programs. The program information is available in four columns – Name, Publisher, Status, and Startup impact. You are click on each of these four columns to view the contents in alphabetical or reverse alphabetical order.

- Name: The Name column displays the name of the running program.
- Publisher: The Publisher column displays the name of the Publisher or the Company of that program.
- Status: The Status column displays the status of that program. It could be either Enabled or Disabled.
- Startup impact: The Startup impact is the most important setting here. It displays the impact of that program on the system. It could one of these – High, Medium, Low, or None. If you want to improve the boot timings of your Windows, then try disabling some of the High impact programs that you may not be using frequently.
Step 4: In order to Disable a currently enabled program, click on that program name, and then click the Disable button at the bottom right of Task Manager.
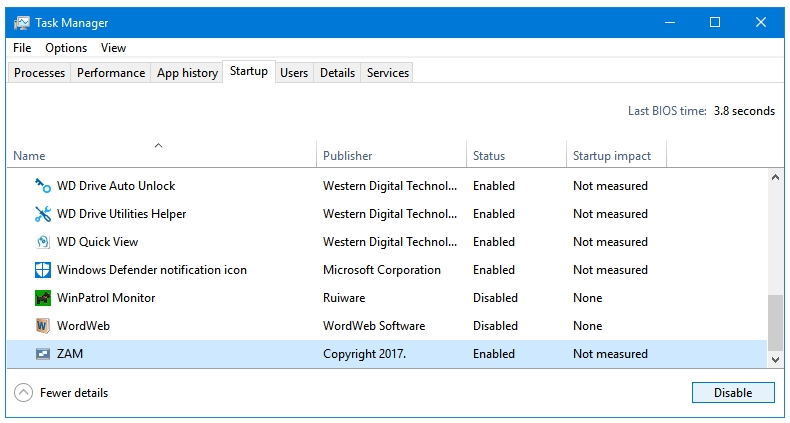
Step 5: In order to Enable a currently disabled program, click on that program name, and then click the Enable button at the bottom right of Task Manager.

This is a quick way to disable or enable multiple programs in one go. But it is advised to disable or enable the startup setting of each program from within that program itself. All of the programs that start automatically with Windows have a setting that lets you enable or disable the automatic startup of that program.
How to Disable or Enable Services in Windows 10, 8.1, 8, 7