Everything about the Windows Hosts file – Definition, Benefits, Locate, Edit, Test, Protect, Download.
- What is DNS
- What is Windows Hosts file
- How the Hosts file Work
- Hosts file Type
- Location of the Hosts file
- Which Address to Use
- Benefits of Using a Custom Hosts file
- How to Edit the Hosts file
- How to Test the Hosts file
- How to Protect the Hosts file
- How to Troubleshoot the Hosts file
- How to Download Custom Hosts files
What is DNS
Before we learn about the Hosts file, we need to know a little about DNS. DNS refers to Domain Name System. The Domain Name System is responsible for the translation of the numerical IP Addresses into human-readable Domain Names. For example, one of the IP Addresses of Google (https://www.google.com) is 74.125.24.99. You can see that remembering and typing a domain name, google dot com, is much easier and quicker than using an IP Address, 74.125.24.99.
A Domain Name System (DNS) uses two components to achieve Domain Name Resolution – a DNS Table and a DNS Server.
- A DNS Server does the job of translation or resolution of the website Domain Name into the IP Address of that website.
- A DNS Table consists of a list of Domain Names and their corresponding IP Addresses.
Whenever a user enters the name of a website in URL bar of the browser, the DNS Servers look for that domain name on the DNS Table, converts the domain name into its IP address, and open the website with that IP address in the web browser.
What is Windows Hosts file
The Hosts file is a plain text system file that maps the domain names to IP addresses. It acts like every Windows user’s own little Domain Name System. Hosts file overrides the DNS settings of the websites mentioned in it on that computer.
If a domain name is mentioned in your hosts file then the operating system won’t use the DNS for its resolution, it reads from the hosts file and performs accordingly.
You do not require a program to run the Hosts file. It boots with the computer, and is already working for you.

How the Hosts file Work
All three of the following addresses – 127.0.0.1, 0.0.0.0, and 255.255.255.255, redirect to your local system. Note that the localhost should always be mapped to 127.0.0.1, and listed at the top of the Hosts file.
The Hosts file works in two ways.
- Blocking Domains
- Redirecting Domains
Blocking Domains
Type one of the three IP addresses mentioned in the previous section. Next, give a space or a tab, and then type the website domain name that you want to block. Now, when you type and enter that domain name into the URL bar of your web browser, it will be mapped to the IP address that you mentioned for it in the Hosts file instead of its original IP address, which is your own computer, the local host.
The web browser makes no outgoing requests from your computer to the Internet. It will not be able to able to access this website, and displays an error message.
Redirecting Domains
Using the same method, you can redirect a website to another website. Type the IP address of that website where you want the other website to be redirected to. Next, type the domain name of the website that you are redirecting to the IP address that you just typed.
For Example, if you want to redirect Google.com to Bing.com, then type the IP address of Bing.com, and then type Google.com in the Hosts file. Save the Hosts file. Now, when you type and enter Google.com in the URL bar of your web browser, it will open Bing.com instead of Google.com.
Hosts file Type
The Hosts file has no extension. If you have enabled file extensions on your Windows then you must be habitual of watching extensions at the end of each file, and you must be wondering why your hosts file isn’t showing any file extensions. Don’t worry it’s not infected; it’s supposed to be just like this. Users can easily edit the Hosts file using the Notepad software.

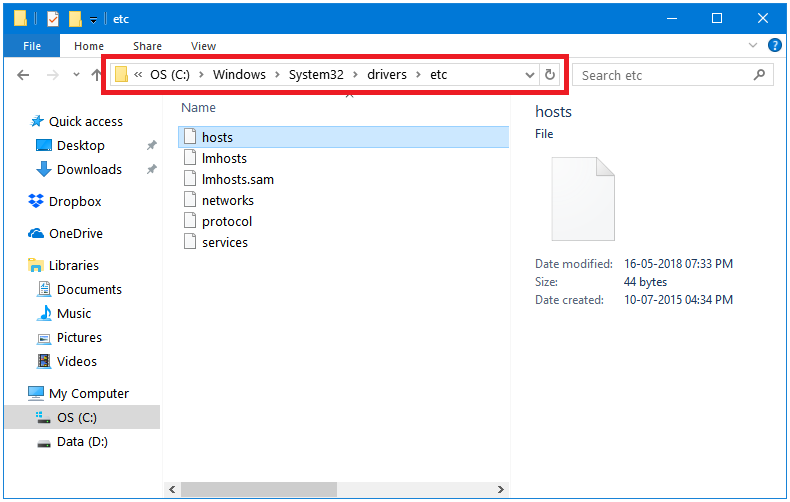
Location of the Hosts file
The Hosts file is located deep inside your system drive, C:. Here is the exact path.
Hosts file Location: C:\Windows\System32\drivers\etc
Which Address to Use
Following are the three IP addresses that are recommended to map the domain names in the Hosts file.
- 0.0.1
- 0.0.0
- 255.255.255
All three of these addresses point to the location of your computer.
127.0.0.1
127.0.0.1, also known as the Localhost is the default address used in the Hosts file for mapping domain names. If you are using a web server software then using 127.0.0.1 in the Hosts file for except for localhost may cause problems. Therefore, in that case, you should use 127.0.0.1 only with localhost as the first line in your Hosts file. Rest of the entries should be mapped to 0.0.0.0 or 255.255.255.255
0.0.0.0
0.0.0.0, also known as the Zero Address is a non-routable invalid target location. When you use this IP addresses in Hosts file entries, the web browser redirects those websites to the computer itself.
255.255.255.255
255.255.255.255, also known as the Broadcast Address is a null address that also refers to the localhost.
Benefits of Using a Custom Hosts file
- Block Ads – Probably, the most important use of the Hosts file is for blocking the ad networks and websites. You can block advertisement networks and websites by adding their names to the Hosts file.
- Block Trackers – Adding the IP addresses of tracking networks and websites disables tracking, and decreases the web page load time.
- Block Malware – There are various Hosts file projects that provide with custom Hosts files that include lists of all kinds of malicious, harmful, and phishing websites. Using one of those in place of the default Windows Hosts file adds another layer of protection to your computer.
- Faster Web Browsing – When you type and enter the name of a website in the URL bar of a web browser, it checks the names of that website first in the hosts file, and then with the DNS server. So, if you add the entries of the websites that you visit regularly, then they will be resolved much faster, because now the web browser doesn’t have to go the DNS server to resolve the domain name. This decreases the time taken to open the websites, hence faster web browsing.
- Redirect Websites – The Hosts file can also be used for redirecting one website to another one. Malware do this a lot, by editing the Hosts file, they redirect the most commonly used websites such as Google to their own malicious websites. You can use the redirection feature to your own advantage.
- Block Ads in Programs – If you are using one those freeware programs that display ads, then with the help of the Hosts file, you can block those ads by blocking the domain and the connected subdomains used by that program to deliver the ads.
- Block Ads Injected by your ISP – Some Internet Service Providers (ISP) inject ads into their networks. If you realize that your ISP is injecting ads into your Internet then you can prevent that by blocking the main domain and all of the connected subdomains of the ad network(s) used by your ISP.
- Test Development Servers – You can test you host server or development server by temporarily redirecting your active website domain name to the IP address of the test server. This way, your domain name is mapped to your test server on your computer. To the rest of the world, it opens the actual website.
- Parental Controls – The Hosts file can be used as a parental controls feature; you can add a list of websites that you don’t want the kids in your household to visit.
- Block Social Media Websites – You can block various social media websites, and other bandwidth and time-consuming websites using the Hosts file.
How to Edit the Hosts file
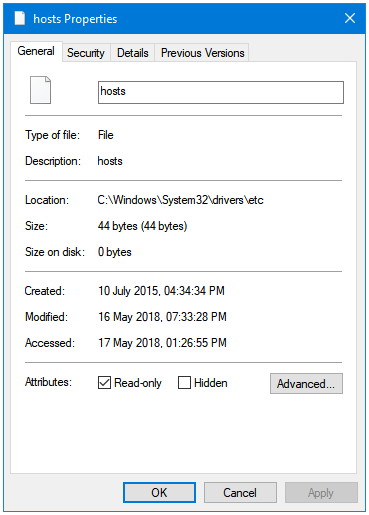
Step 1: Go the hosts file directory. Right-click on it, and open the Properties window. Clear the Read-only checkbox. Click Apply, and then OK.
![]()
![]()
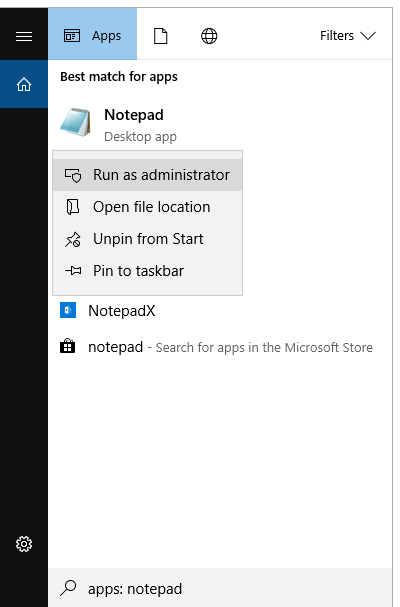
Step 2: Open Notepad with Administrative privileges.
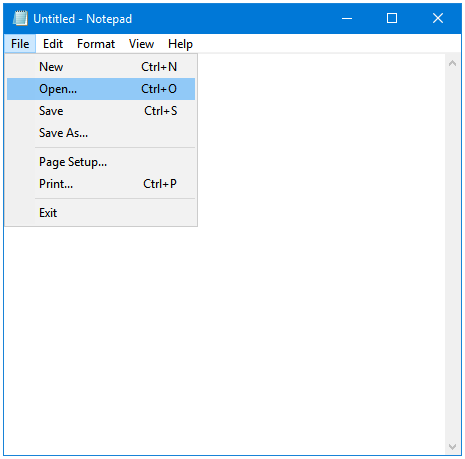
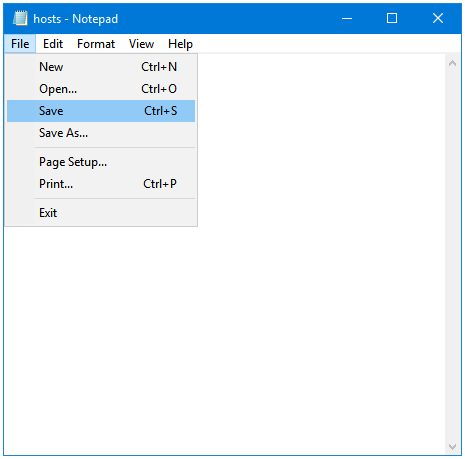
Step 3: Open hosts file in Notepad.
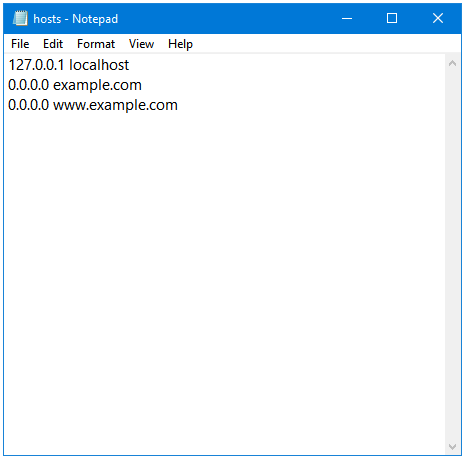
Step 4: Type the entries in your hosts file.
Step 5: Save the file.
Step 6: Tick the Read-only checkbox again in the Hosts file Properties window.
The changes are applied automatically without needing a system restart.
How to Test the Hosts file
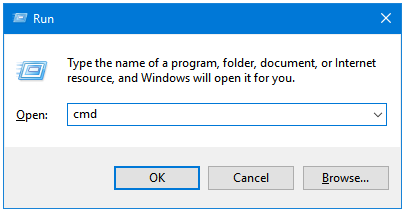
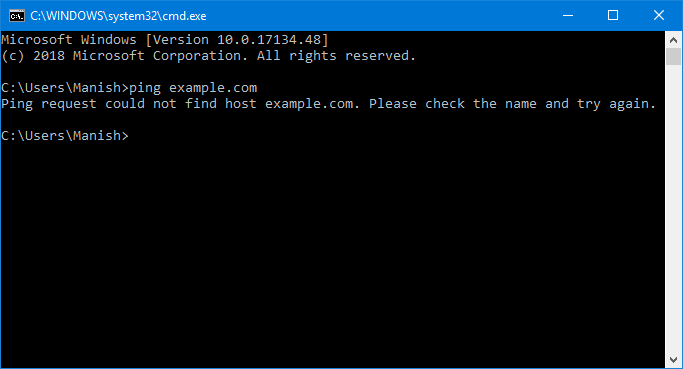
Step 1: Press Windows + R keys together to open the Run dialog box. Type cmd in the text input field, and then press OK. It will open the Windows Command Prompt.
Step 2: In the Command Prompt window, type ping example.com, and then press Enter.
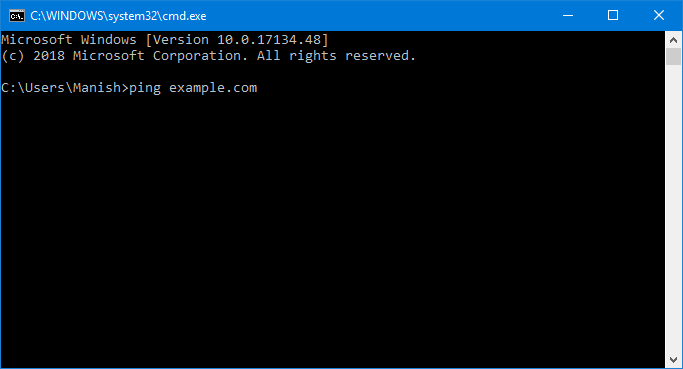
Step 3: If everything went well, you will see a message saying ping request could not find host.
How to Protect the Hosts file
If you can edit your Hosts file, then others can too. Malware can take ownership of this file and redirect most commonly used sites such as Google to other malicious websites.
You can use a small program called SpywareBlaster. It protects many important system files including the Hosts file.
Some third-party Firewall programs have a setting to protect the Hosts file.
How to Troubleshoot the Hosts file
Following are some of the Hosts file Troubleshooting tips.
- Check the File Type, Hosts file has no extension.
- Look for any Syntax Errors. You should only use either a tab or one space between IP addresses and domain names.
- Make sure that there are no Comment Markers (#) at the beginning of each entry.
- Put the main domain name, and all of the subdomains to block the website i.e., www as well as non-www domain names.
- Save the file in only ANSI or UTF-8 text encoding style.
- Look for any file permissions related errors
- If troubleshooting the file and syntax related errors does not work, then create new hosts file from scratch, and then move it into its directory.
- Run the ipconfig /flushdns command in the Command Prompt after editing the Hosts file.
- Clear the Use automatic configuration script checkbox in the Local Area Network (LAN) Settings window under the Internet Properties.
- Go to the Adapter settings, and then reset the TCP/IP v4 and v6 settings by clearing their checkboxes, and then ticking them back again.
- Make sure the Hosts file is set to Read-only.
- Wildcard doesn’t work in Hosts file i.e., you cannot put *.example.com to block all of the subdomains of example.com You have the enter the subdomains one by one to block them.
- Check the Windows Registry Key; it should point to the correct location of the Hosts file. The path of the Hosts file mentioned under DataBasePath Registry String under the following Registry Key
HKEY_LOCAL_MACHINE\SYSTEM\CurrentControlSet\Services\Tcpip\Parameters - Check the File Name, it should just hosts, and not host, h0st, ho$t, etc.
- Scan your computer for malware. Some malware can alter the DNS service related Windows DLL file, dnsapi.dll, to point to a fake Hosts file.
15 Troubleshooting Tips for Windows Hosts File. Make It Work Again.
How to Download Custom Hosts files
Download the pre-compiled and up-to-date Hosts files from these three wonderful sources:
1. hpHosts
https://hosts-file.net/?s=Download
2. MVPS Hosts
http://winhelp2002.mvps.org/hosts2.htm
3. Block Adverts
http://hostsfile.mine.nu/downloads/
Use only one of these at a time.
That’s about it.