Windows HomeGroup
HomeGroup is a Network-level physical-resource and data sharing feature of Windows. With HomeGroup, you can share Pictures, Videos, Music, Documents, and Printers & Devices with other computers on the same local network connected to the HomeGroup. HomeGroup was introduced with Windows 7 in 2009.
How to Disable HomeGroup & Remove HomeGroup Icon from Windows Navigation pane
- Leave HomeGroup from HomeGroup Settings
- Stop and Disable HomeGroup Services
- Remove HomeGroup Icon from Navigation Pane using Registry Editor
Leave HomeGroup from HomeGroup Settings
Step 1: Press Windows + E keys together to open Windows File Explorer.

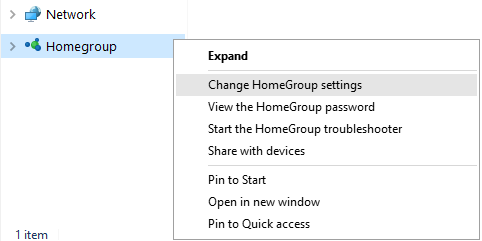
Step 2: Right-click on the HomeGroup icon in the navigation pane, and click on the Change HomeGroup settings option.
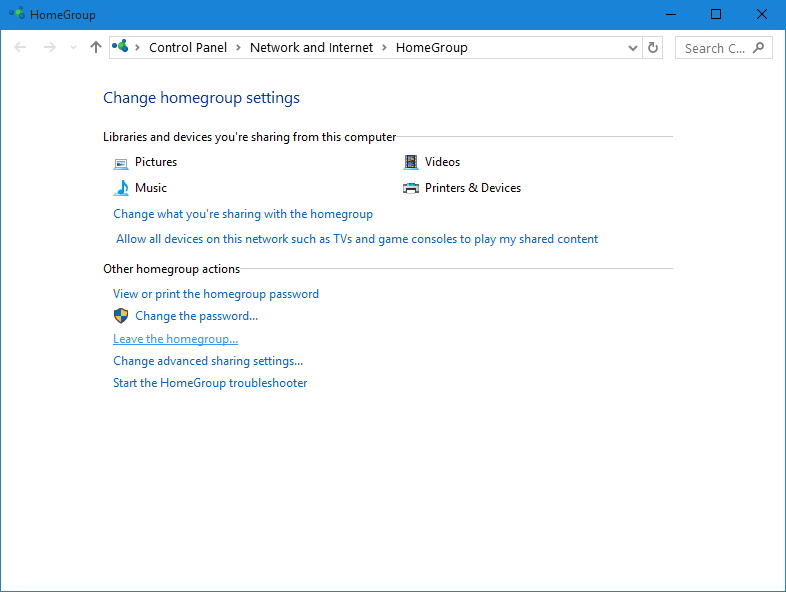
Step 3: In the Change homegroup settings window, click on the Leave the homegroup… link.
Step 4: In Leave the Homegroup window, click the first option called Leave the homegroup.

Step 5: Click Finish the exit HomeGroup Settings.

Stop and Disable HomeGroup Services
HomeGroup runs the following two services.
- HomeGroup Listener
- HomeGroup Provider
We need to Stop these services, and then prevent them from starting again with Windows.
Step 1: Press Windows + R keys together to open the Run dialog box. Type services.msc in the text field, and then click OK to open Services.

Step 2: Press the H key on your keyboard to quickly navigate to the services starting with H letter. Find the two HomeGroup services.

Step 3: Double-click on the HomeGroup Listener to open its Properties window. Under the Startup type: dropdown menu, select the Disabled option. Click Apply, and then OK. This will prevent this service from starting again.

Step 4: Under the Service status: section, click on the Stop button to stop this service.
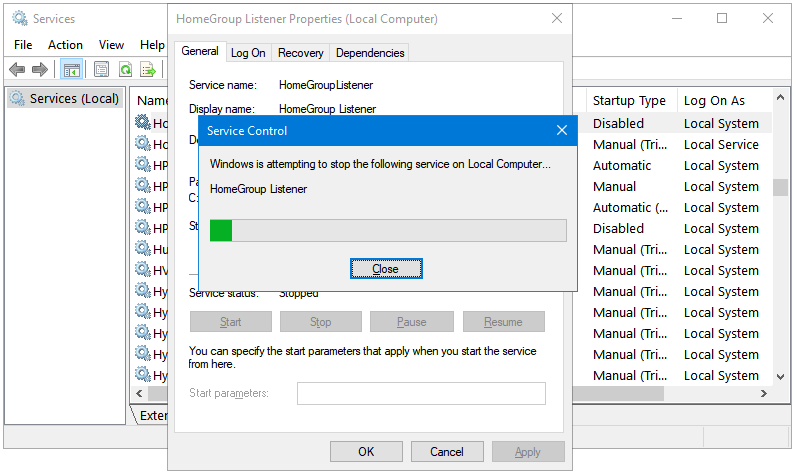
Step 5: Follow the same steps for the second service. Disable HomeGroup Provider.

Step 6: Stop HomeGroup Provider.

Step 7: Now, you’ll notice that both of the services are listed as Disabled in under the Startup Type option. The Status option is empty.

Remove HomeGroup Icon from Navigation Pane using Registry Editor
Step 1: Press Windows + R keys together to open the Run dialog box. Type regedit in the text field, and then click OK to open Registry Editor.

Step 2: Navigate to the following key in Windows Registry Editor.
Computer\HKEY_LOCAL_MACHINE\SOFTWARE\Classes\CLSID\{B4FB3F98-C1EA-428d-A78A-D1F5659CBA93}

Step 3: Right-click on the above mentioned Registry Key, click New, and then click DWORD (32-bit) Value to create a new Registry Value.

Step 4: Rename the newly created Vale to System.IsPinnedToNameSpaceTree.

Step 5: The default is 0, which means the HomeGroup icon is disabled in the Navigation pane.

If you want to Enable HomeGroup again, reverse the steps.